Exterior House Painting

Exterior House Painting 101: Your Comprehensive Homeowner’s Guide

Is your home’s exterior starting to look faded, cracked, or weather-worn? This isn’t just a cosmetic issue—it may be a warning sign that your home’s first line of defence against the elements is breaking down. In the Midwest, fluctuating temperatures, humidity, and sun exposure accelerate paint deterioration, putting wood, stucco, and siding at risk. Over time, damaged exterior coatings can let moisture seep in, leading to costly problems like rot, mildew, and insulation damage. 

A study published in the Journal of Architectural Engineering found that homes with worn paint experienced significantly higher moisture infiltration in climate-stressed regions like the Midwest.

A well-executed exterior paint job doesn’t just transform your home’s appearance—it restores its protection. This guide walks you through every process step, from planning and preparation to material selection and hiring a pro, helping you achieve lasting results with confidence and clarity.

Why Paint Your Home’s Exterior? Benefits and Timing

Repainting your home’s exterior is a vital part of property maintenance that goes beyond surface-level aesthetics. It strengthens your home’s defence against environmental stressors, increases its value, and extends the lifespan of the materials beneath. Here’s why timely exterior painting matters:

1. Key Benefits of Exterior Painting

  • Boosts Curb Appeal: A fresh coat of paint gives your home an immediate visual upgrade, making it more attractive and increasing perceived value.
  • Protects Structural Materials: High-quality exterior paint shields wood, siding, and trim from moisture, sun damage, and pests.
  • Prevents Wood Rot and Mold: By sealing surfaces properly, paint helps block water infiltration, which can lead to costly rot or fungal growth.
  • Improves Energy Efficiency: Light-colored paints can reflect sunlight, helping to keep your home cooler in warmer months.
  • Increases Property Value: Well-maintained exteriors contribute to a positive first impression, which is crucial if you plan to sell.
  • Extends Surface Lifespan: Regular painting can delay the need for significant repairs by preserving the condition of your home’s exterior materials.

2. Signs It’s Time to Repaint

  • Fading or Peeling Paint: This indicates that your current coating has broken down and no longer offers protection.
  • Cracked or Shrinking Caulk: Gaps in caulking suggest movement or wear and may allow moisture intrusion.
  • Visible Wood Damage: Soft, crumbling, or discoloured wood signals paint failure and possible rot.
  • Stains, Mold, or Mildew: Often appear in shaded or humid areas where moisture lingers.
  • The desire for a New Look: Sometimes, it’s time for a colour change or modernization.

3. Best Time of Year to Paint

  • Spring to Early Fall: The most stable temperatures and lower humidity levels are ideal for exterior painting.
  • Mild, Dry Conditions: Optimal results are achieved between 60°F and 75°F with minimal wind and no rain in the forecast.
  • Avoid Extreme Weather: Painting in high humidity, cold temperatures, or direct sun can prevent proper adhesion and curing.

Research Stats

A 2021 study published in the Journal of Building Engineering found that paint deterioration in wood-based exteriors increased by over 35% when exposed to unregulated moisture and UV radiation, particularly in continental climates like the Midwest. This reinforces the importance of timely repainting and proper surface protection.

Planning Your Exterior Painting Project

A successful exterior painting project starts long before the first coat of paint is applied. Careful planning ensures you stay on budget, choose the right materials, and achieve lasting results. Whether doing it yourself or hiring a professional, here’s how to set a solid foundation for your project.

planning your exterior painting project

1. Setting Goals and Expectations 

Before anything else, assess your home’s current condition. Inspect the exterior and look for peeling paint, surface damage, mildew, or wood rot. Note which areas need minor touch-ups versus major repairs. From there, define what you want to achieve — is the goal simply a fresh look, or are you addressing deeper maintenance concerns?

Also, consider your aesthetic goals: are you updating the home’s appearance, preparing to sell, or matching recent renovations? Clarifying these objectives will guide your material choices, colour selection, and timeline.

2. Budgeting for Your Project 

Creating a realistic budget means understanding the key cost drivers:

  • Home Size & Condition: Larger homes and those needing extensive prep will cost more in terms of both materials and labour.
  • Paint Quality: Premium exterior paints offer better coverage and durability but come at a higher price point.
  • Labour Costs: If hiring professionals, labour may account for 50–70% of your total budget.
  • Materials & Supplies: Don’t forget caulk, primer, brushes, tape, drop cloths, ladders, or scaffolding.
  • Contingency Fund: Always spend 10–15% of your budget on unexpected repairs or material overages.

Getting a few estimates from local painters or running a detailed materials list can help you refine your numbers before work begins.

3. DIY vs. Hiring a Professional 

Painting your home can save money, but it comes with time, safety, and quality trade-offs. Consider the following:

  • DIY Pros: Cost savings, personal satisfaction, and total control over the project.
  • DIY Cons: Physically demanding work, high risk at elevations, and potential quality issues without the right tools or techniques.
  • Hire a Pro If Your home has multiple stories, complex trim work, or surface damage or if you lack the time and equipment to complete the job correctly.

A professional painter brings efficiency, warranty coverage, and the experience to handle issues that might otherwise go unnoticed — ultimately delivering a longer-lasting finish.

Research Stats

According to the report, homes that undergo proper preparation and use higher-quality exterior paints can save homeowners between $300 and $1,000 in the long run due to fewer repainting costs, reduced maintenance, and the ability to better resist weather damage.

Choosing the Right Paint and Colors

Selecting the right paint and colour palette for your home’s exterior is crucial to its appearance and durability. This section will walk you through the key aspects to consider to make informed, lasting decisions.

types of exterior paint explained

1. Types of Exterior Paint Explained

Latex vs. Oil-Based Paints

      • Latex Paint: Water-based latex paints are the most common for exterior applications. They’re easy to clean, dry quickly, and are highly durable. They are ideal for most surfaces, including wood, stucco, and siding. Additionally, latex paints are more resistant to UV rays and extreme temperatures, making them a top choice in climates with varying weather conditions like the Midwest.
      • Oil-Based Paint: Known for its smooth finish and excellent adhesion, oil-based paint is typically used on wood and metal surfaces that need strong protection against weather. However, it takes longer to dry, requires more extensive cleanup, and tends to yellow over time, making it less popular than latex paints for exteriors today.

Finishes: Flat, Satin, Semi-Gloss

      • Flat Finish: Offers a matte look that helps conceal imperfections on the surface. It’s ideal for homes in areas where a smooth, non-reflective appearance is desired. However, it can be harder to clean and maintain.
      • Satin Finish: Offers a slight sheen and is easier to clean than a flat finish, making it suitable for areas with moderate exposure to dirt and weather. It’s one of the most popular finishes for exterior walls.
      • Semi-Gloss Finish: Known for its high shine, semi-gloss is ideal for trim, doors, and shutters. It is durable and easy to clean, making it great for high-touch areas exposed to harsh weather.

Choosing Based on Surface Material 

    • Wood: Wood surfaces should be painted with high-quality latex or oil-based paints, depending on the look and durability needed. Oil-based paints offer better protection if your wood siding is prone to moisture or rot.
    • Siding: Vinyl or aluminium siding generally does well with latex paint because of its flexibility and ease of application. However, proper preparation and priming are essential for ensuring paint adhesion.
    • Stucco: A more textured surface, stucco requires special attention, and paint should be breathable to avoid trapping moisture. Acrylic latex paint is a common choice for stucco exteriors.
    • Brick: Brick is porous, so it needs a paint that will seal the surface while allowing for moisture evaporation. Use a specialized masonry paint or elastomeric paint to provide flexibility and protection.

2. Selecting the Perfect Color Palette 

Once you’ve selected the correct type of paint, it’s time to think about colour. Your choice of colour will define the character of your home and affect its curb appeal. Here are some tips for selecting the right colour palette:

Considering Architectural Style 

Each architectural style has colours that complement its design. For example, traditional homes look great with rich, deep colours, while modern homes might benefit from minimalist, neutral tones. Ensure that the colours you choose highlight the features of your home’s design.

Neighborhood Harmony 

While personal preference matters, it’s also essential to consider the colours used in your neighbourhood. Choosing a colour that fits in with the overall aesthetic of your area can help maintain property values and improve curb appeal.

Using Color to Enhance Features  

Using contrasting colours highlights architectural features like trim, windows, and doors. For example, darker shades on the main exterior paint colour with lighter trim can create a sophisticated look. Conversely, bright accent colours can make architectural details pop.

Sampling Colors 

Before committing to a colour, test samples on a small section of your home. Observe how the paint looks at different times of day, as natural light can dramatically change a colour’s appearance. Many paint suppliers offer sample sizes that can be applied to the surface to see the effect before going all in.

Preparing Your Home's Exterior: The Crucial First Steps

Proper preparation for exterior painting  is the main foundation of a successful project. Skipping or rushing through these essential steps can lead to poor paint adhesion, early wear, and a less-than-professional finish. 

1. Ensuring Paint Adhesion

Paint needs a clean, smooth, and stable surface to adhere properly. If the surface is dirty or damaged, the paint won’t stick as well, leading to peeling and chipping over time. Preparation eliminates these issues, ensuring a long-lasting finish.

2. Maximizing Durability and Longevity

Proper preparation reduces the likelihood of cracks, peeling, and other forms of wear. Ensuring the surface is well-prepared gives the paint the best chance to provide superior protection against the elements for years to come.

3. Achieving a Flawless Finish

A flawless finish isn’t just about the paint — it’s about the surface you’re applying it to. Removing imperfections and ensuring smooth surfaces will produce a clean, professional finish that elevates your home’s curb appeal.

4. Step-by-Step Preparation Guide 

steps by steps guide

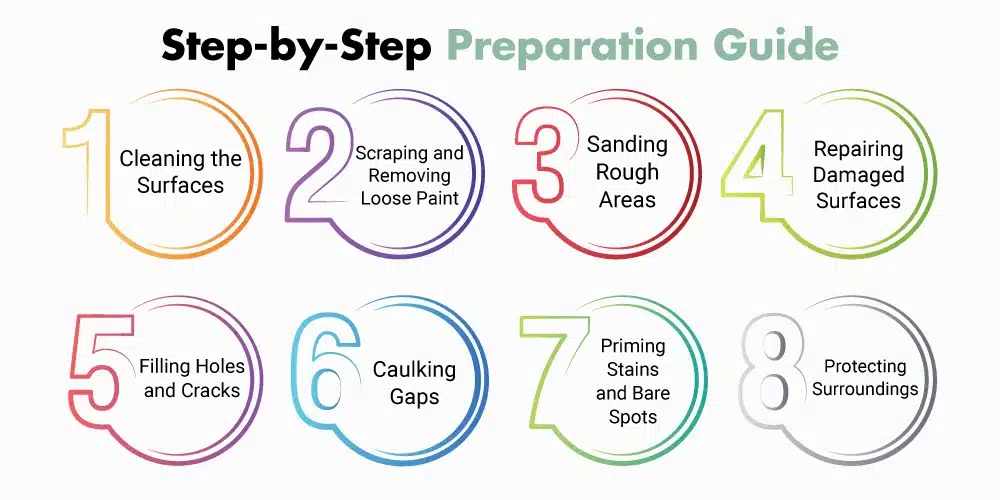
Cleaning the Surfaces (Washing, Removing Mildew)

Clean the exterior surfaces thoroughly to remove dirt, mildew, grime, and oils. Pressure washing is an effective method, especially for larger homes. Use a specialized cleaner or a mixture of bleach and water for areas with mildew or mould to kill growth and prevent future mould problems.

Scraping and Removing Loose Paint

Before applying new paint, remove any loose or peeling paint with a scraper or wire brush. This will help create a smooth surface for the new coat and ensure it bonds properly.

Sanding Rough Areas

Sand any rough or uneven spots, especially where paint has been scraped or chipped. This helps smooth the surface and prevents rough patches that could affect the appearance of the new paint.

Repairing Damaged Surfaces (Wood, Stucco, etc.)

Inspect the surfaces for damage, such as cracks, holes, or rotting wood. Repairing these issues is vital to ensure a smooth, even surface. For wood surfaces, replace rotted sections. Patch up cracks with a suitable exterior filler or patching compound for stucco or masonry.

Filling Holes and Cracks

Use an exterior-grade filler to fill small holes, gaps, and cracks. Allow the filler to dry completely, then smooth it to match the surrounding surface.

Caulking Gaps

Apply caulk around windows, doors, and trim to seal any gaps that allow moisture to get under the paint. This step also prevents air leaks, improving energy efficiency. Use high-quality, paintable caulk for long-lasting results.

Priming Stains and Bare Spots

Apply a stain-blocking primer to any bare spots, stains, or areas that have been repaired. Priming ensures the paint adheres properly, preventing issues such as tannin bleed-through or rust staining. It also provides a uniform surface for the paint to go on smoothly.

Protecting Surroundings (Masking, Drop Cloths)

Use painter’s tape and plastic sheets or drop cloths to mask off areas you don’t want to paint, such as windows, door hardware, and light fixtures. Cover the ground and surrounding plants with tarps to avoid spills and splatters.

5. Exterior Painting Preparation Checklist

Task

Key Considerations / Action Steps

Inspect Surfaces

Carefully examine all siding, trim, and eaves for peeling paint, cracks, mildew, wood rot, or water damage. Document any problem areas needing repair before painting.

Clean Surfaces (Wash)

Use a pressure washer or soft wash system with a siding-safe detergent to remove dirt, mildew, and chalky residue. Let all surfaces dry fully before moving forward.

Scrape Loose Paint

Remove all flaking or peeling paint with a paint scraper or wire brush. Focus on feathering edges to create a smoother surface for new paint to adhere.

Sand Rough Areas

Smooth out transitions between old and bare surfaces using medium to fine grit sandpaper (80–120 grit). This improves paint adhesion and finish.

Repair Damaged Surfaces

Replace rotten wood, patch damaged stucco, and address structural issues. Repairs must be fully cured before priming or painting.

Fill Small Holes/Cracks

Use an exterior-grade filler or caulk for minor cracks and dents. Let it cure fully, then sand flush with the surface for a uniform finish.

Caulk Gaps

Seal joints and gaps around windows, doors, trim, and fascia using paintable exterior caulk to prevent water intrusion and drafts.

Prime Bare Spots/Stains

Apply a quality exterior primer to any exposed wood, patched areas, or stains. This ensures better coverage, durability, and color consistency.

Mask Windows, Doors, Trim

Use painter’s tape and plastic or paper sheeting to protect areas that shouldn’t be painted. Remove tape promptly after painting to avoid peeling.

Cover Plants/Ground

Lay down drop cloths or plastic tarps over landscaping, patios, and paths. Avoid suffocating plants by securing covers loosely.

The Painting Process: Techniques and Best Practices

Executing your exterior paint job with the right tools and methods can be the difference between a long-lasting, beautiful finish — and one that fades or fails prematurely.

1. Essential Tools and Equipment  

    • Brushes, Rollers, and Applicators
      Use angled brushes for cutting in edges and trim, and high-quality rollers for smooth, even coverage on broad surfaces. Microfiber or woven rollers work well for textured exteriors.
  • Spray Guns (Pros and Cons)

Sprayers offer speed and smooth finishes on large areas but require experience, careful masking, and ideal weather conditions. Not ideal for windy days or DIY beginners.

  • Ladders and Scaffolding
    Extension ladders are suitable for most two-story homes. For larger or more complex elevations, scaffolding provides greater stability and access.
  • Safety Gear
    Don’t overlook personal protection: safety glasses, dust masks (especially during sanding), gloves, and non-slip footwear are essential.

2. Application Techniques

Technique

Best For

Key Tips

Brush Technique

Edges, trim, tight areas

Cut in around edges with steady strokes; load brush halfway to avoid drips.

Roller Technique

Large flat surfaces (walls, siding)

Use the “W” pattern, keep a wet edge to prevent lap marks and uneven coverage.

Spraying Technique

Wide, uninterrupted surfaces (e.g. stucco, brick)

Maintain even overlap, backroll after spraying for better adhesion and finish.

3. Working with Different Siding Types 

Different materials demand different techniques and paints:

  • Wood Siding: Use a primer and two coats of high-quality latex. Back-brushing ensures paint penetrates the grain.
  • Vinyl Siding: Paint must be vinyl-safe to avoid warping. Choose lighter colors and avoid very dark shades unless the siding is approved for it.
  • Stucco: Requires a masonry primer and elastomeric or acrylic paint to bridge hairline cracks and resist moisture.
  • Brick: Use breathable masonry paint or mineral-based coatings. Avoid sealing bricks unless absolutely necessary — moisture needs to escape.

4. Applying Multiple Coats 

  • Two Coats are Standard: One coat rarely delivers full coverage or durability. Two coats ensure a uniform finish and stronger weather protection.
  • Drying Time Matters: Always follow the manufacturer’s guidance. In Midwest conditions, allow at least 4–6 hours between coats, longer in cooler or humid weather.

Pro Tip:

 For the smoothest, most professional results, always paint from the top down and in the direction of the material’s natural texture (e.g., with the wood grain).

Understanding Exterior Painting Costs

Planning a painting project without understanding the cost breakdown can lead to unexpected surprises. Exterior painting costs vary based on several key factors that homeowners should consider before budgeting.

5. Factors That Influence Price 

  • Home Size and Stories: Larger homes or multi-story properties require more paint and labor, significantly increasing costs.
  • Condition of Existing Surfaces: Homes needing extensive prep (scraping, repairs, priming) take more time and materials.
  • Type and Quality of Paint: Premium paints offer better coverage and longevity but come at a higher upfront cost.
  • Architectural Complexity: Intricate trim, irregular shapes, or decorative features demand more detail work and time.
  • Accessibility: Steep roofs, tight spaces, or areas requiring scaffolding can increase labor costs.
  • Labor Rates: Prices vary regionally — in places like Overland Park, KS, skilled painters may charge higher but provide local expertise.

6. Getting Accurate Estimates

  • What to Look for in a Quote: Ensure the quote includes surface prep, paint type, number of coats, labor, and cleanup.
  • Comparing Bids: Always get at least 2–3 written estimates. Look beyond price — consider warranties, experience, and materials used.
  • Avoiding Hidden Costs: Watch for vague language or missing prep work. Clarify if permits, repairs, or color sampling are included.


7. Average Cost Ranges

Understanding what drives painting costs can help you set a realistic budget. For homeowners in areas like Overland Park, KS, most homes feature vinyl, fiber cement, or wood siding, and range between 1,800–2,500 sq. ft. These typical homes fall within a mid-to-high cost range due to regional labor rates and Midwest weather-related prep needs.

Estimated Exterior Painting Cost Factors

Factor

Impact on Cost

Notes

Home Size

High

Larger homes need more paint and longer labor hours.

Number of Stories

Medium–High

Two- and three-story homes require ladders/scaffolding and add risk.

Surface Condition

High

Weather-worn exteriors common in Kansas require heavy prep (scraping, priming).

Paint Quality

Medium

Investing in high-quality paint ensures better protection against the region’s seasonal extremes.

Architectural Detail

Medium

Homes with gables, trim, and shutters need more time and precision work.

Location

Medium

Labor costs in Overland Park reflect skilled trade rates and demand.

For a typical two-story home in Overland Park, the cost may range from $3,500–$6,500, depending on these variables.

Ensuring Durability and Longevity

A well-executed exterior paint job isn’t just about looks — it’s a long-term investment in your home’s protection. The lifespan of your paint finish can vary widely based on several key factors, especially in regions with diverse Midwest weather conditions like Overland Park, KS.

1. Factors Influencing How Long Paint Lasts

  • Quality of Preparation: Thorough surface cleaning, repairs, and priming allow paint to adhere properly and resist early wear.
  • Quality of Paint Used: Premium exterior paints contain better resins and pigments, offering superior resistance to fading, cracking, and moisture.
  • Number of Coats Applied: Applying two full coats ensures better coverage and durability compared to a single coat.
  • Climate and Weather Exposure: UV rays, snow, rainfall, and temperature swings can all break down paint faster—making weather-resistant paint a wise choice.
  • Quality of Application: Even technique, correct drying times, and professional-grade tools all contribute to a lasting finish.

2. Maintenance Tips for a Long-Lasting Finish  

  • Regular Cleaning: Wash exterior walls annually to remove dirt, mildew, and pollutants that degrade paint over time.
  • Inspecting for Damage: Check for cracking, peeling, or soft wood at least once a year—especially after harsh seasons.
  • Addressing Issues Promptly: Touch up minor chips and repaint high-exposure areas before they lead to moisture damage or deeper structural issues.

With the right paint, prep, and upkeep, a high-quality exterior job can last 7 to 10 years or more, even in challenging climates.

Common Mistakes to Avoid

A well-executed exterior paint job isn’t just about looks — it’s a long-term investment in your home’s protection. The lifespan of your paint finish can vary widely based on several key factors, especially in regions with diverse Midwest weather conditions like Overland Park, KS.

1. Factors Influencing How Long Paint Lasts

  • Quality of Preparation: Thorough surface cleaning, repairs, and priming allow paint to adhere properly and resist early wear.
  • Quality of Paint Used: Premium exterior paints contain better resins and pigments, offering superior resistance to fading, cracking, and moisture.
  • Number of Coats Applied: Applying two full coats ensures better coverage and durability compared to a single coat.
  • Climate and Weather Exposure: UV rays, snow, rainfall, and temperature swings can all break down paint faster—making weather-resistant paint a wise choice.
  • Quality of Application: Even technique, correct drying times, and professional-grade tools all contribute to a lasting finish.

2. Maintenance Tips for a Long-Lasting Finish  

  • Regular Cleaning: Wash exterior walls annually to remove dirt, mildew, and pollutants that degrade paint over time.
  • Inspecting for Damage: Check for cracking, peeling, or soft wood at least once a year—especially after harsh seasons.
  • Addressing Issues Promptly: Touch up minor chips and repaint high-exposure areas before they lead to moisture damage or deeper structural issues.

With the right paint, prep, and upkeep, a high-quality exterior job can last 7 to 10 years or more, even in challenging climates.

Hiring a Professional Painter

While DIY painting is appealing to some homeowners, hiring a professional can offer peace of mind, superior results, and long-term value—especially for larger or more challenging projects.

1. When to Consider Hiring 

  • Large or Complex Projects: Multi-story homes or those with intricate architectural features often require specialized equipment and expertise.
  • Lack of Time or Expertise: If your schedule is tight or you’re unfamiliar with proper prep and application techniques, professionals can complete the job efficiently and correctly.
  • Safety Concerns (Height): Working at heights or handling scaffolding requires safety gear and experience—something professionals are trained for.
  • Desire for a Warranty: Many professional painters offer warranties on labor and materials, giving you assurance against premature failures.

2. How to Choose a Reputable Painter 

  • Check Licenses and Insurance: Ensure the contractor is licensed and carries liability insurance to protect your property and their crew.
  • Ask for References and Portfolios: Reviewing past projects helps verify quality and consistency.
  • Get Detailed Written Estimates: A comprehensive quote should include prep work, materials, timelines, and payment terms—no surprises.
  • Read Reviews: Use trusted platforms like Google, Angi, or the Better Business Bureau to verify customer satisfaction.

3. What to Expect When Working with Professionals

  • Project Timeline: Reputable painters provide a clear schedule, including prep, painting, and cleanup stages.
  • Communication: Expect regular updates and responsiveness to your questions or concerns throughout the project.
  • Warranty and Follow-Up: Many pros offer warranties and follow-up visits to ensure satisfaction and address touch-ups if needed.

Hiring the right professional ensures not just aesthetic appeal, but long-lasting performance and peace of mind.

Frequently Asked Questions (FAQ)

How often should I paint my home's exterior?

The lifespan of exterior paint depends on several factors, including paint quality, surface prep, local climate, and maintenance. Typically, a well-applied high-quality paint can last 5 to 10 years, sometimes longer on durable siding materials. Inspect your exterior annually and consider repainting when you notice signs of fading, peeling, or cracking.

No—painting over peeling surfaces is a critical mistake. All loose or flaking paint must be fully scraped and sanded, then properly primed before new paint is applied. Skipping this step compromises adhesion and leads to premature failure.

Exterior painting typically ranges from $1.50 to $4.00+ per square foot, depending on home size, surface condition, paint quality, and labor rates in your region. Complex architectural details and prep needs can increase the total. To budget accurately, obtain multiple detailed estimates from reputable local professionals.

For optimal results, apply exterior paint in temperatures between 50°F and 85°F (10°C to 30°C). Painting in extreme heat or cold can negatively affect drying time and adhesion. Always refer to the manufacturer’s specific guidelines on temperature and humidity for best results.

Yes—premium paints provide better coverage, longer-lasting color, mildew resistance, and improved durability. Though more expensive upfront, they often require fewer coats and extend the time between repaints, offering better long-term value.

From Planning to the Final Coat – Make Your Exterior Paint Project One to Be Proud Of

A successful exterior painting project begins with thorough planning, proper preparation, and informed decisions about materials, colour, and application. Every step plays a vital role in the project’s outcome, from evaluating your home’s current condition to choosing the right paint and deciding whether to DIY or hire professionals.

A freshly painted exterior elevates your home’s curb appeal and provides long-term protection against weather, moisture, and structural wear. With the right approach, you can enjoy a result that looks great and lasts for years.

Ready to transform your home’s exterior? Begin by assessing your home’s surfaces, exploring modern colour palettes, or connect with Aaron Painting and Remodeling—your trusted partner for high-quality, reliable painting services in the Midwest. We’re here to help you bring your vision to life professionally and precisely.

Remember: A well-executed paint job is more than just a facelift—it’s an investment in your home’s value, integrity, and pride of ownership.

Scroll to Top
CALL NOW