
Is your home showing signs of soft, cracked, or crumbling wood?
Wood rot is slowly eating away at your deck, windows, or siding — often in places you rarely check. Left untreated, wood rot weakens your home’s structure, risks costly repairs, and threatens your family’s safety. Knowing the difference between wood rot and termite damage is crucial for proper treatment. Most people don’t notice it until it’s too late. That soft board under the window? That wobbly step on the deck? They’re not just minor issues — they’re warnings.
But here’s the good news: you can catch and stop wood rot before it spreads.
This simple guide shows you how to identify early signs, prevent damage, and fix it fast — saving you thousands in repairs and keeping your home solid and safe.
Understanding Wood Rot: Nature's Wood Decomposers at Work
What Is Wood Rot and Why Should You Care?
Wood rot is a natural process where wood breaks down because of tiny organisms, mainly fungi. These fungi feed on damp wood, causing it to weaken, crack, or crumble over time. Many homeowners think wood rot is harmless or rare — but it’s a serious issue. Left untreated, it can damage your home’s structure, cost you thousands in repairs, and even risk your family’s safety. Understanding what wood rot is helps you spot it early and deal with it before it worsens.
What Causes Wood Rot?
Wood rot happens when fungi grow on damp wood. These microscopic organisms feed on the wood fibers, breaking them down and making the material weak, soft, and brittle over time. This process is natural outdoors — but inside your home, it can cause severe structural damage if left untreated.
For fungi to grow, three things are always needed:
- Moisture: Damp wood is a fungi magnet.
- Oxygen: Like all living things, fungi need air.
- Warmth: They grow fastest in temperatures between 60-90°F (15-32°C).
This is often called the Rot Triangle — if one side is missing, rot can’t start.
Types of Wood Rot: Wet Rot, Dry Rot, and Soft Rot
There are three common types of wood rot, and it’s essential to know how to tell them apart because they behave differently and appear in different places.
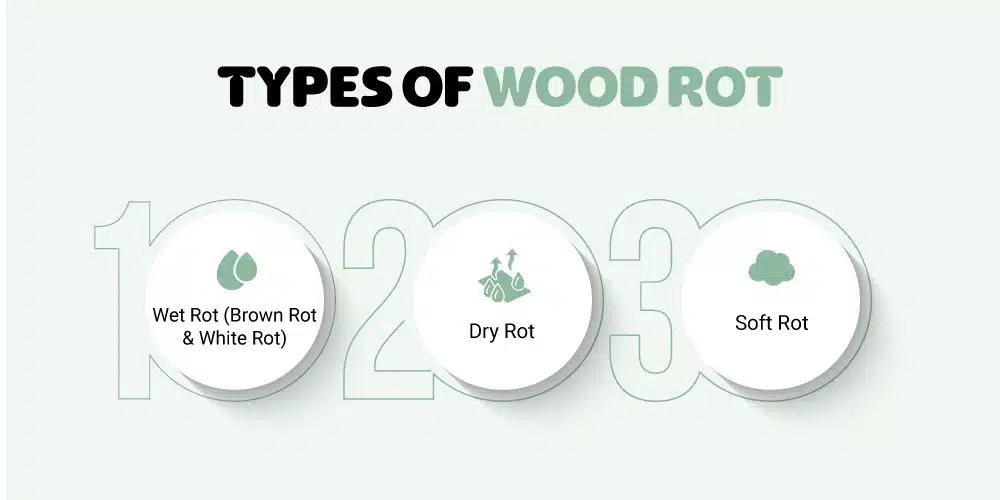
Wet Rot (Brown Rot & White Rot)
Wet rot grows in wood that stays damp for a long time.
- Brown rot makes wood dry, crumbly, and dark brown in color.
- White rot makes wood soft, stringy, and light or bleached in color.
Where it appears: You’ll often find this on window frames, decks, basements, fences, or any place where water collects and wood stays wet.
2. Dry Rot
Dry rot is the most aggressive type. It spreads very fast, even in areas that don’t look wet.
- It causes wood to crack and leaves behind orange-brown dust (fungal spores).
- You might also see mushroom-like growth called fruiting bodies.
Why it’s serious: Dry rot can travel through walls and floors, destroying wood without much warning.
3. Soft Rot
Soft rot is slower, but it still damages wood badly over time.
- The wood feels soft, breaks apart easily, and turns dark.
- It usually appears where wood touches wet soil — like under decks, fence posts, or wooden garden beds.
Causes of Wood Rot: Moisture, Environment, and Vulnerable Spots
When it comes to what causes wood rot, several key factors work together. The most important ones are explained below:

The Moisture Factor: Wood Rot’s Best Friend
The number one cause of wood rot is moisture. Without moisture, the fungi responsible for rot simply can’t survive. They need dampness to grow, spread, and break down wood fibers. Wood usually stays safe when its moisture level is below 20% — but rot becomes a real danger once it goes higher.
Familiar moisture sources in homes include:
- Roof leaks and overflowing gutters that let water soak into walls or wood trims
- Leaking pipes, whether obvious under a sink or hidden inside walls
- Condensation in areas with poor ventilation, like bathrooms, kitchens, attics, and crawl spaces
- Ground contact, where wood touches soil or absorbs rising damp
- Rain splashback, when water hits the ground and bounces back onto siding or wooden posts
If you manage moisture, you control rot. Simple as that.
Oxygen and Temperature: Supporting Actors in the Rotting Drama
Besides moisture, wood-rotting fungi also need oxygen. Like other living things, fungi can’t survive without air. Temperature also plays a huge part. Most fungi grow best in temperatures between 20°C and 30°C (68°F to 86°F).
What makes it worse:
- Warm, humid conditions speed up the growth
- Temperature changes, combined with trapped moisture, create perfect breeding spots for fungi
That’s why rot spreads faster in poorly ventilated areas like attics, basements, and crawl spaces.
Vulnerable Areas in Your Home: Prime Targets for Wood Rot
Some places in your home are naturally more at risk because of how often they get wet or poorly ventilated.
Exterior areas to watch:
- Decks and patios — constantly exposed to rain, humidity, and sun
- Siding and trim, especially near the ground or around windows and doors
- Window frames and sills, where water pools and drains poorly
- Door frames and thresholds, especially near the ground where splashes hit
- Fences and sheds, constantly facing outdoor weather
Interior areas prone to rot:
- Bathrooms, where steam, splashes, and humidity gather
- Kitchens, especially under sinks and near dishwashers
- Basements and crawl spaces, where dampness and condensation buildup
- Attics, where poor ventilation and roof leaks trap moisture
Early Detection is Key: Spotting Wood Rot Before It Spreads
Catching wood rot early can save you from expensive repairs later. The good thing is — if you know what signs to look for, you can catch it before it gets out of control. Let’s break down what to notice:
1. Visual Clues: What to Look For
Start by sifting through the wood. Here’s what your eyes might catch:
- Color Changes
- Wood turning dark brown, gray, or black.
- Bleached or light-colored patches, especially with white rot
- Strange stains or streaks running along the wood
- Surface & Texture Changes
- Soft, spongy spots (you can test by pressing gently with a screwdriver)
- Crumbly, brittle wood that easily breaks
- Wood that seems to shrink or collapse in places
- A cracked, blocky look (cubical cracking) in brown rot
- Stringy or fibrous wood — common in white rot
- Fungal growths like white, grayish cottony strands (called mycelium) or small mushroom-like structures (fruiting bodies), especially in dry rot
- Unusual Growths
- Moldy, mushroom-like growths on or around the wood
- Web-like mycelium strands running across surfaces (in dry rot)
2. Tactile Signals: What You Can Feel
Sometimes, your hands can tell you what your eyes might miss.
- Softness
- Press on the wood — if it gives way easily, that’s a problem.
- Compared to nearby healthy wood, rotten wood will feel much softer.
- Brittle or Crumbly Texture
- If the wood crumbles or breaks apart easily when pressed
- If it splinters with little pressure
3. Structural Weaknesses: When It Gets Serious
Rot doesn’t just affect appearance — it weakens structures, too.
- Sagging or Uneven Surfaces
- Decks, floors, or roofs that look like they’re sinking or dipping
- Uneven spots in ceilings or walls
- Bouncy or Soft Floors
- Floors that feel springy, soft, or unstable underfoot
- Wobbly or Unstable Areas
- Deck railings, stairs, or posts that move when touched
Where to Inspect: Common Rot Hotspots
Now that you know what to look and feel for — here’s where you should check:
Outside the House
- Around windows and doors — sills, frames, jambs, thresholds
- Decking, railings, support posts, stairs
- Siding, especially near the ground and corners
- Fascia boards and soffits (under the roof edge, near gutters)
- Fence posts, sheds, wooden garden beds
Inside the House
- Under sinks in kitchens and bathrooms
- Around toilets, tubs, and showers
- Basement walls, crawl space joists, beams, and foundations
- In the attic, especially around roof vents and areas where water could leak in
Step:1 Master Moisture Control: The First & Most Important Step
Fungi that cause wood rot can’t survive without moisture. If you control the humidity, you stop the rot from ever starting.
How to Control Moisture:
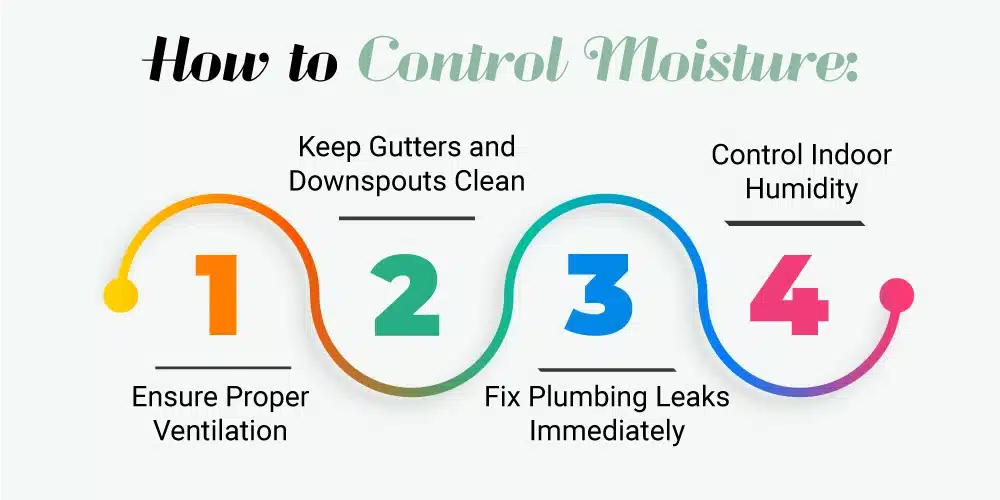
1. Ensure Proper Ventilation
Good ventilation removes damp, stale air and replaces it with dry, fresh air — preventing moisture buildup.
- In Attics:
- Install ridge vents, soffit, and gable vents for proper air circulation.
- Check vents regularly for blockages like dust, leaves, or insulation.
- Ventilation keeps the attic dry and prevents wood from absorbing moisture.
- In Crawl Spaces:
- Use cross-ventilation (vents on opposite sides) to let air move through.
- In wet areas, vapor barriers (plastic sheets) are laid on the ground to stop ground moisture.
- Use dehumidifiers in humid climates or enclosed spaces to control humidity levels.
2. Keep Gutters and Downspouts Clean
Water from rain should flow away from your home, not collect around it.
- Clean gutters at least twice a year (spring and fall).
- If you have trees nearby, check them more often.
- Remove leaves, twigs, mud, and blockages preventing water flow.
- Extend downspouts 4-6 feet from your home’s foundation so water doesn’t pool around the walls.
- Check for leaks and broken sections, and ensure water is draining correctly.
3. Fix Plumbing Leaks Immediately
Leaks from inside your home can lead to hidden moisture problems.
- Regularly check under sinks, around toilets, dishwashers, washing machines, and behind appliances.
- Look for:
- Water stains or dark patches
- Musty smells
- Mold spots
- Listen for dripping sounds behind walls or under floors.
- If your water bill goes up suddenly, check for hidden leaks.
- Use a moisture meter in areas you suspect might be damp.
4. Control Indoor Humidity
High humidity makes it easier for wood to absorb moisture.
- Use exhaust fans in bathrooms and kitchens when bathing or cooking.
- Keep dehumidifiers in damp basements, crawl spaces, and laundry areas.
- Vent clothes dryers outside — not indoors.
- Open windows occasionally to let fresh air in.
Step 2: Use Wood Preservatives and Sealants: Protective Shield
Even if you can’t obliterate moisture, you can protect wood by treating it.
Types of Wood Preservatives:
- Borate-based: Safe for inside and above-ground wood, effective against fungi and termites.
- Copper-based (like ACQ, CA): Best for outdoor wood exposed to rain and ground contact.
- Oil-based: Repels water — great for decks, fences, and siding.
How to Apply:
- Clean the wood — remove dirt, mold, and old paint or stains.
- Sand rough surfaces so the preservative soaks in properly.
- Only apply when the wood is completely dry.
- Use a brush for small areas and details and a sprayer for large, flat surfaces.
- Follow product instructions carefully for best results.
Add Sealants or Paint:
- Sealants protect seams, corners, and joints where water sneaks in.
- Paints and stains add another layer of water protection while improving the appearance.
Step 3: Regular Inspection and Maintenance: Stay One Step Ahead
Catching problems early saves time and money and keeps your home safe.
Set an Inspection Schedule:
- Inspect your home’s woodwork in spring and fall at least twice a year.
- Check after big storms, heavy rain, or snow.
Areas to Focus On:
- Outside:
- Window frames, sills, and doors
- Decks, railings, stairs, and patios
- Fence posts, sheds, and pergolas
- House siding, especially near the ground
- Roof fascia boards and soffits (under gutters)
- Inside:
- Under sinks and around dishwashers
- Near bathtubs, showers, and toilets
- Basements, crawl spaces, and foundations
- Attics — check rafters, beams, and ceiling joints
Use a checklist to make sure you don’t miss anything.
- Trim Plants and Trees:
- Plants that touch wood trap moisture.
- Trim shrubs, vines, and tree branches to keep at least 12-18 inches of space between plants and your house walls.
- This allows sunlight and airflow, which helps dry out surfaces.
Step 4: Smart Material Choices: Build It Right
Sometimes prevention starts before a problem begins — when you choose the right materials.
Where to Use Pressure-Treated Wood:
- Decks, fences, pergolas
- Garden beds and posts in contact with soil
- Sill plates and ground contact structures
Pressure-treated wood is made to resist decay and rot caused by moisture.
Pick the Right Treatment:
- Use ground-contact-rated lumber for posts or wood near soil.
- Consider decking or exposed structures. Rot-resistant woods like cedar, teak, or redwood are natural.
- You can use composite wood alternatives that don’t rot in high-humidity areas.
Wood Rot Prevention Checklist
You can turn these points into a handy one-page printable checklist for homeowners to follow during inspections.
Example:
- Clean gutters and downspouts
- Check attic and crawl space ventilation
- Inspect for plumbing leaks
- Trim vegetation near wood
- Inspect decks and fences
- Apply wood preservative where needed
Wood Rot Repair: A Practical Overview for Homeowners
Wood rot is repairable — but knowing when to fix it and when to replace it is essential. Let’s break it down in clear, simple steps.
When to Repair vs. Replace: Assessing the Damage
Before deciding what to do, you need to check how bad the damage is.
How to Check for Rot:
- Use a screwdriver or awl to gently press or poke into the wood.
- See how deep it goes. Soft, crumbly wood means rot is present.
- Check if the wood still feels strong or has lost its load-bearing strength.
When You Can Repair:
- If it’s in the early stages, it’s just surface-level or minor decay.
- If the rot is in non-structural wood like:
- Window or door trim
- Decorative elements
- Small patches on decks or fences
- If it’s localized and easy to reach.
When You Must Replace:
- If it’s extensive or affects structural parts like:
- Beams
- Floor joists
- Deck posts
- Load-bearing supports
- If large areas are decayed and can’t safely hold weight.
- If fixing it would cost more than replacing — or repairs won’t last long.
Basic Wood Rot Repair Techniques and Products
Once you’ve assessed the damage, here’s how to fix it:
Step 1: Remove the Rotted Wood
- Use chisels, saws, or rotary tools to cut away all soft, rotten wood.
- Cut back to firm, healthy wood.
- Properly dispose of rotted wood to prevent spreading fungal spores.
Step 2: Strengthen with Wood Consolidants (If Needed)
What are Wood Consolidants?
They’re liquid products that soak into soft wood, harden it, and make it solid again.
- Apply to remaining wood after removing rot.
- Ideal for early-stage rot or when the wood is slightly soft but still in place.
Step 3: Fill Gaps with Wood Fillers and Epoxies
- Wood Filler:
- Suitable for filling small gaps or missing chunks after consolidation.
- Epoxy Fillers:
- Strong, long-lasting fillers for structural repairs and larger holes.
- After it dries, sand and shape it to match the surrounding wood.
Step 4: Replace Heavily Damaged Wood
- Cut new wood pieces to the correct size and shape.
- Secure them using screws, nails, or wood adhesives.
- Prime and paint or stain to match existing finishes and protect it from moisture.
DIY vs. Professional Wood Rot Repair: Knowing Your Limits
Some repairs are easy for homeowners, while others are best left to the pros.
You Can DIY If:
- The rot is minor and non-structural — like:
- Decorative trim
- Minor deck boards
- Siding patches
- You have basic carpentry skills and tools.
- The area is easily accessible.
- The wood isn’t critical to your home’s structure.
Call a Professional If:
- The rot involves structural parts:
- Joists, beams, posts, or floor supports.
- The damage is extensive or hidden behind walls, floors, or ceilings.
- It’s a dry rot infestation, which can spread aggressively and needs professional treatment.
- You don’t feel confident or don’t have the right tools.
Remember: Safety first — structural repairs can be dangerous if done incorrectly. |
Take Action Now to Protect Your Home from Wood Rot!
Wood rot isn’t something to take lightly. It quietly damages your home’s structure and beauty, but the good thing is — it’s preventable and treatable. You can save yourself from big repairs later with awareness and timely care. Don’t wait for minor issues to grow into expensive problems. Keep an eye on your home, control moisture, and act fast when you see early signs of rot. Your home deserves to stay strong and protected for years to come.
And if you ever need professional help — whether it’s wood rot repair, painting, or remodeling — Aaron’s Painting and Remodeling is always here to help you keep your home in perfect shape.