Limewashing or whitewashing is a way of protecting walls by applying a very diluted solution and has been used as a paint since Classical times.
A study in New Design Ideas claims that “Limewash, or whitewash, is a durable and antimicrobial finish for both interior and exterior”.
This timeless technique not only provides an attractive, weathered look but also offers long-lasting protection. In this blog post, we’ll explore the differences between limewash and whitewash, their advantages and disadvantages, and how they can be used to enhance the appearance of your spaces.
What is Limewash?
Limewash is a traditional paint made from slaked lime (calcium hydroxide) mixed with water. It is typically applied to porous surfaces like brick, stone, and plaster. The process of making limewash involves crushing limestone, burning it to produce quicklime, and then mixing it with water to create a paste. This paste is aged before being thinned with more water for use as a paint. Limewash has a unique chalky, matte finish that provides a breathable coating, allowing moisture to escape from the surface.
What is Whitewash?
Whitewash is a simpler and more modern alternative to limewash. It is made by mixing water with slaked lime, sometimes adding salt or other ingredients like chalk or casein to improve texture. Whitewash is typically used to coat porous surfaces, such as wood, brick, and stone. Unlike limewash, which has a softer, more varied finish, whitewash tends to create a more solid, consistent white appearance. It is often used for interior and exterior applications to give a vintage or weathered look to a surface.
The Major Differences Between Whitewash and Limewash
Whitewash | Limewash |
Made from water, lime, and fillers like chalk | Made from slaked lime, water, and pigments |
Less breathable | Highly breathable |
Provides a smooth, opaque finish | Provides a matte, textured finish |
Less durable, may require touch-ups often | More durable, bonds chemically to surfaces |
More affordable | More expensive |
Often used on fences, barns, and interiors | Ideal for historic buildings, stone, and brick walls |
Eco-friendly but less sustainable | More eco-friendly and sustainable |
Which is better: whitewash or limewash?
Choosing between whitewash and lime wash depends on your specific needs. So understanding their unique qualities will help you make the right decision.
1. For Historic Homes and Stone/Brick Walls
If you have a historic property, especially with stone or brick walls, limewash is the preferred option. Its breathability makes it perfect for old buildings that need to allow moisture to escape. The chemical bonding of limewash ensures it will last longer, reducing the need for frequent touch-ups. The natural finish of limewash also enhances the appeal of the building, giving a timeless look.
2. For Budget-Friendly and Simple Applications
Whitewash is the better choice if you’re looking for a budget-friendly option for simple applications, like fences or barns. It’s easy to apply, and its opaque finish gives a clean and uniform appearance. While it won’t last as long as limewash and may require more maintenance over time, it can be a cost-effective choice for less demanding surfaces.
3. For Eco-Friendliness and Sustainability
Both whitewash and limewash are eco-friendly, but limewash is the more sustainable option. Lime is a naturally abundant material, and because limewash bonds with the surface, it lasts longer and requires fewer repaints. Whitewash, although made with non-toxic materials, is less durable, which means it could need reapplication more frequently, resulting in a higher overall environmental impact.
4. For Long-Term Durability and Aesthetic Appeal
If durability and long-term aesthetic appeal are your priorities, limewash is the best choice. Its long-lasting properties make it ideal for areas exposed to the elements. Its subtle depth and matte finish also create a more unique and aesthetically pleasing appearance, particularly on larger surfaces or historical structures
Limewash Vs Whitewash: Advantages
Limewash is an effective surface covering for a wide range of water-absorptive surfaces. It is vapour-permeable, allowing a building to “breathe.” This makes it an excellent choice for maintaining the health of a structure by allowing moisture to escape, which is especially important in older buildings.
Limewash is robust and, when applied in the proper number of coats, can consolidate and improve the condition of the underlying substrate. It is stable and long-lasting, providing excellent protection to surfaces over time. Its durability makes it a reliable solution for preserving the integrity of both historical and modern structures.
As stated in the International Building Lime Symposium by Peter Mold and Richard Godbey, Limewash is a compatible covering for masonry and stucco, offering both protective and aesthetic benefits.
Limewash is beautiful in either its brilliant white, non-pigmented native state or when pigmented with compatible oxides to complement architectural color schemes. Its versatility in color choices makes it suitable for various architectural styles, offering a timeless aesthetic.
Historically, limewash has been an effective way to protect, maintain, and beautify the surface of historically significant structures. It remains a preferred choice for heritage conservation, ensuring the preservation of architectural integrity while enhancing the building’s appearance.
Additionally, limewash can be an effective and innovative method for finishing more modern surfaces. It is materially inexpensive and well-suited to both professional and do-it-yourself application, making it an accessible option for many.
Surface preparation for sound, previously limewashed surfaces is straightforward. Generally, it only requires a washdown with water to remove accumulated dirt and growth, or with a mixture of diluted vinegar to remove scale. This ease of preparation further adds to the practicality of limewash as a surface treatment.
Whitewash is an affordable option compared to other types of paint, making it a budget-friendly solution for both interior and exterior surfaces. Whitewash is made from natural materials like lime, water, and pigments, making it a more environmentally friendly option than chemical-based paints.
Whitewash allows the surface it is applied to breathe, helping to prevent moisture buildup and reduce the risk of mold or mildew. Studies highlight that whitewash has natural antibacterial and antifungal properties, which can help to reduce the growth of harmful microorganisms on walls and surfaces.
Whitewash is relatively easy to apply and can be used for DIY projects. It requires fewer tools, and the application process is straightforward. It provides a rustic, weathered look, adding a vintage charm to surfaces, especially when applied to brick, stone, or wood.
Whitewashed surfaces require little upkeep and can last for many years, especially when properly maintained. They also can be easily touched up if needed. Whitewash can be applied to a wide range of surfaces, including brick, stone, wood, and plaster, making it a versatile option for both interior and exterior use.The light color of whitewash helps to reflect more light, brightening spaces naturally and making them feel more open and airy.
What are the disadvantages of whitewash?
Whitewash is not as durable as other finishes, often requiring touch-ups or reapplications over time. It may wear off faster when exposed to the elements, especially outdoors. This means you might need to maintain it more frequently.
Additionally, whitewash is typically limited to white, making it less versatile than limewash, which comes in various shades. If you’re looking for more color options, whitewash may not be the best choice.
Whitewash can also be prone to moisture damage. Areas with high humidity or moisture exposure can cause it to peel or fade quicker, making it unsuitable for bathrooms or kitchens without proper sealing.
What are the disadvantages of lime wash paint?
Limewash can have unpredictable results when it comes to color. The natural product can vary in hue and texture, especially after it dries. This makes it harder to achieve a consistent look.
The application process of limewash is also more complex. It requires at least three thin coats, which can be time-consuming. This is a drawback for those looking for a quick and easy solution.
While durable, limewash still needs touch-ups every 5-7 years. This maintenance requirement is particularly noticeable in outdoor applications exposed to weather. It may also not work well on non-porous surfaces like plastic or metal.
Considering a fresh coat of paint for your home’s exterior, one important question often arises: How long does exterior paint last?
How To Whitewash?
Materials Needed:
|
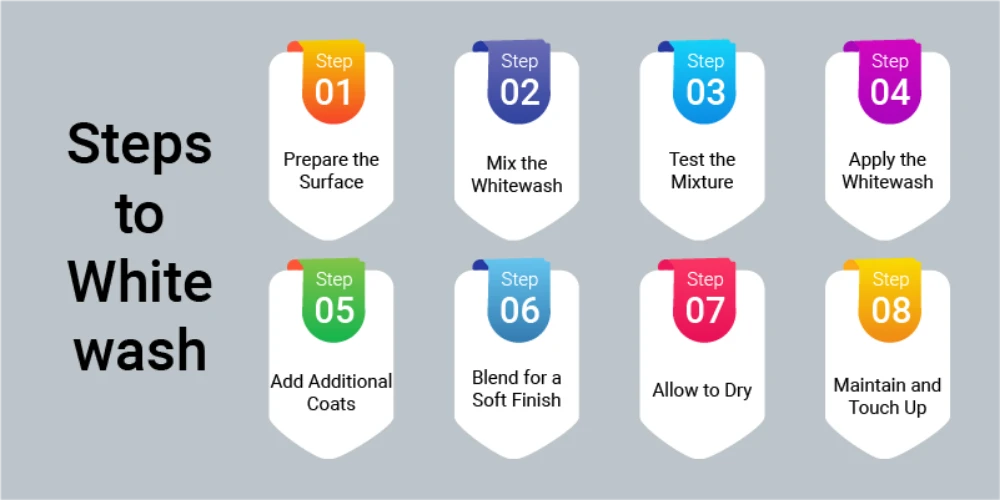
Steps to Whitewash:
1. Prepare the Surface
Clean the surface thoroughly to remove dirt, dust, or old paint. For wooden surfaces, lightly sand the area to remove any old finishes and create a better bond for the whitewash.
2. Mix the Whitewash
In a large container, mix 1 part slaked lime with 3 parts water. Stir well to create a smooth, creamy consistency. If desired, add a tablespoon of salt for extra durability (especially for outdoor use).
3. Test the Mixture
Before applying the whitewash to the entire surface, test it on a small, inconspicuous area to ensure the consistency and color are to your liking. You can adjust the water or lime ratio based on your preference for opacity.
4. Apply the Whitewash
Use a large paintbrush or a rag to apply the whitewash to the surface in thin, even layers. Brush in long, sweeping strokes, following the grain of the wood or surface texture. Apply the first coat, and let it dry for about 30 minutes to 1 hour.
5. Add Additional Coats
Once the first coat is dry, apply additional coats as needed to achieve the desired coverage. You can add as many layers as you want, but typically 2-3 coats are sufficient.
6. Blend for a Soft Finish
After applying the whitewash, you can use a clean rag to gently wipe away any excess, blending the color and softening the finish.
7. Allow to Dry
Let the whitewashed surface dry completely, which may take up to 24 hours, depending on humidity and temperature.
8. Maintain and Touch Up
Whitewash may need touch-ups over time, especially on high-traffic areas or exterior surfaces. Simply apply another coat as needed.
Tips:
|
Whitewashing is an easy and effective technique for giving walls, furniture, and other surfaces a timeless, antique look. Must see: Cost to Hire a Painter: Pricing Guide for Interior & Exterior Projects
How To limewash?
Limewashing is a traditional and eco-friendly method for treating walls and surfaces, offering a unique, matte finish. It’s ideal for porous surfaces like brick, stone, or plaster. Here’s how to limewash effectively:
Materials Needed:
|
Steps to Limewash:
1. Prepare the Surface
Clean the surface thoroughly to remove dirt, dust, or old paint. For surfaces that have been painted before, you may need to scrape off the old paint. For best results, limewash is applied to clean, porous surfaces like brick, plaster, or stone.
2. Mix the Limewash
If using lime putty, dilute it with water to achieve the desired consistency (generally 1 part lime putty to 2-3 parts water). If you’re using hydrated lime, mix 1 part lime powder with 5 parts water to create a paste, then add water until you get a smooth, creamy consistency. You can also add natural pigments to tint your limewash to your preferred color.
3. Test the Mixture
Before applying the limewash to the entire surface, test it on a small section to ensure you’re happy with the color and texture. Limewash can appear darker when wet but lightens as it dries.
4. Apply the Limewash
Use a masonry paintbrush to apply the limewash to the surface. Apply it in thin, even coats, using long, sweeping strokes. Aim for at least three coats for the best results. Start from the top and work your way down.
5. Feather the Strokes
As you apply the limewash, feather your strokes to create a subtle, textured finish. You can apply multiple layers, allowing each layer to dry for about 4-6 hours before applying the next. The number of coats will depend on the look you want to achieve.
6. Allow Each Coat to Dry
Let each coat dry completely before adding another. Limewash becomes lighter as it dries, so keep that in mind when deciding how many coats are needed.
7. Maintain the Limewash
Limewash is naturally resistant to mildew and mold but may need to be refreshed every 5-7 years, depending on the conditions of the surface. You can simply apply another coat of limewash to maintain the finish.
8. Cure the Limewash
Limewash needs to cure to bond with the surface properly. It can take several days to fully cure, so avoid touching or scrubbing the surface too soon.
Tips:
|
Upgrade Your Home with Aaron's Painting and Remodeling
Limewash or whitewash, each option offers unique benefits to enhance the aesthetic and durability of your home. It’s essential to consider the surfaces, maintenance requirements, and desired look before making a decision.
For expert guidance and flawless application, trust Aaron’s Painting and Remodeling for all your painting and remodeling needs. With years of experience, we specialize in delivering top-notch results that transform your space. Reach out today for your free consultation and avail Local Painting and Remodeling Services!


